
Tuesday, August 24, 2010
Bomber Girl Step by Step
I started posting this on Twitter as I completed each step of creating this image, but I ended up getting super busy and never finished. So I thought it would be cool to put it all together instead.
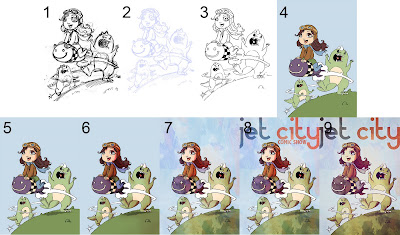
Step 1 - I first do my layout in Photoshop using a tablet to draw it out. I enjoy this method since I can sketch around quickly till I get the composition I like.
Step 2 - I turn the line art into a light blue to print it out on the paper I will be using to ink on. If I am doing washes or using watercolours I keep the layout black and I lightbox it instead.
Step 3 - Inking! I ink away with my brush pen following the light blue lines. Things sometimes change a little in the inking process.
Step 4 - I scan the image and open it in Photoshop to do the flats. I go back and forth a lot with my colours till I get some that work well together.
Step 5 - I add the shadows. I like to keep the shadows a little rough and sketchy to match the brush line art.
Step 6 - I like to add a slight colour burn over the shadows. I find it makes them pop more and adds more shadow variation. I sometimes change this step up a little and maybe overlap or multiply depending on the look I want. Sometimes I may skip this step all together like in my Waking Up Abbey web comic.
Step 7 - Texture! I love textures and cool brushes. It gives it a painted look and it's also lots of fun. I usually have 2 to 3 texture levels to get the look I am looking for. This sometimes involved overlaying, colour buring, multiply, etc layers. Each change in layer style creates a new look.
Step 8 - Text. I usually take my completed art into Illustrator to add text to it. Editing and arranging text is a lot easier in Illustrator than it is in Photoshop for me (For example, lettering my webcomics is done in Illustrator). In this case since the text was very simple and not a lot of it I just did it in Photoshop. I take a lot of time with text since I am not the best at graphic design. I am happy with how this came out. I also took out the words Comic Show since they did not look good.
Step 9 - This step I only do for certain things. I take my completed file, text and all into a photo editing program called Aperture. I usually use this program to edit and fix up my photos, but I find it sometimes does cool things to my illustrations. It is very easy to tweek the colours in this program and I find I sometimes create effects I can't do in Photoshop. Sometimes the change is very subtle but I find it really makes a difference in the over all look.
That's it for now! Hope everyone enjoyed this step by step to how I create my art. Till next time!
Monday, August 23, 2010
Fan Expo 2010
Hey Everyone! That time of the year has finally come! Fan Expo 2010!
I can be found at P57A between Francis Manapul at P56 and Marcus To at P57B.
I will be doing commissions this weekend. 4X4 watercolours for $10 and 6X9 watercolours for $30. Full colour of course :) If you would like to pre-order a commission please email me at agnes@mymisiu.com. Last year at the show my commission list filled up so make sure to come by early!
I will also be selling Vinyl Stickers, Static Cling Window Stickers, Prints, My Book, and possibly Charms.
Also, please remember that...
Kids 12 and under who bring to the show a completed activity page from my ENTERTAINMENT section get a FREE gift!
Hope everyone is as excited as I am for the show! See you there!
Tuesday, August 10, 2010
Imagination Station Page 2
Imagination Station Web Come Page 2 is now up! "uh oh"
Click Here to View!!
Click Here to View!!
Friday, August 6, 2010
Subscribe to:
Comments (Atom)